Add beautiful,
it's in our nature
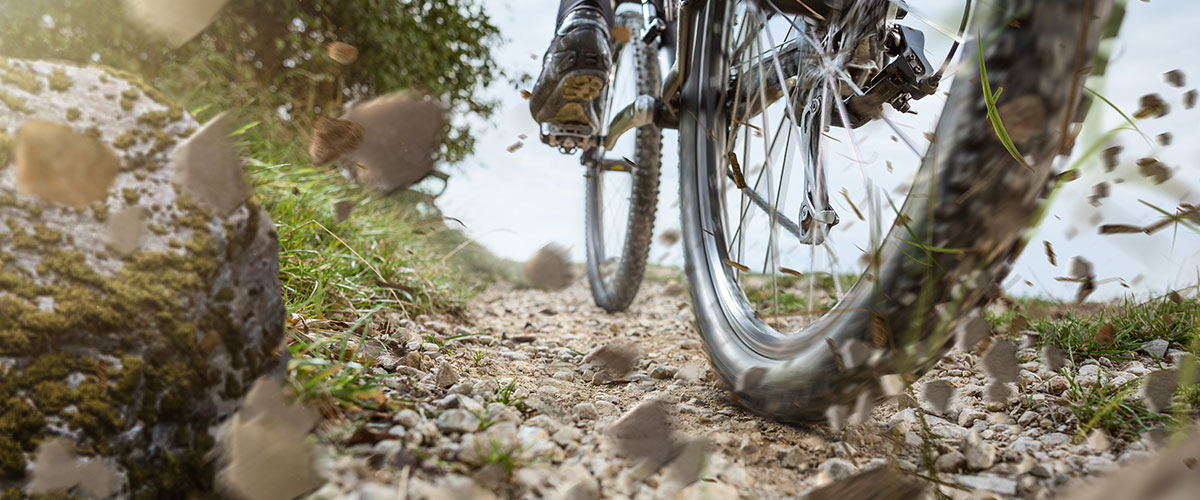
Mountain Bike Preparation: 2 – Technique
 Any cyclist who regularly rides on flat terrain is used to hills and undulating circuits.
But the mountains are a different story in terms of duration and intensity of effort. flaws have more pronounced negative consequences than on flat terrain, both during the ascent and the descent.
Here is a brief overview of the points to work on.
And even if you don't climb like Alberto Contador or Nairo Quintana, a successful cycling holiday at Chalet La Source is well worth a few weeks of preparation!
The climbing technique
Learn to breathe effectively
- Deep, regular breathing contributes to proper oxygenation and CO2 removal, thus increasing performance. A common mistake in cycling is breathing only with the upper part of the rib cage, leading to erratic breathing during difficult sections (hyperventilation).
- Breathe from your diaphragm, inhale through your nose: to maximize chest expansion, you must get used to inhaling through your nose, first expanding your abdomen without straining your rib cage, which expands naturally thanks to the diaphragm. Nasal inhalation also has the advantage of preventing your mouth from drying out quickly.
- Coordinate your breathing: on a steady climb, coordinating your breathing with your pedaling cadence helps to increase consistency and reduce fatigue.
- Practicing this outside of cycling: thanks to heart coherence apps like Kardia, you can train yourself to reduce your breathing from 15-20 breaths per minute (normal) to 10 per minute using abdominal breathing. Yoga, Pilates, and swimming are very useful complements for learning to breathe properly.
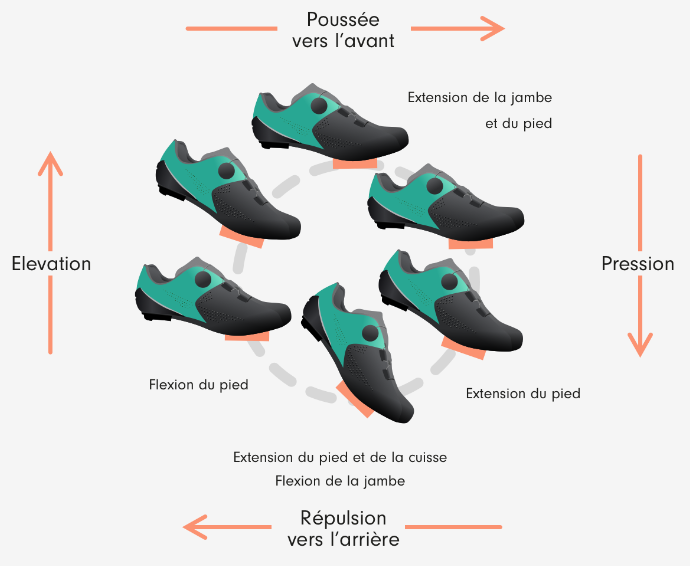
Optimizing your pedal stroke: the famous "Smooth pedaling"
 This technical skill is not specific to the mountains, and it will take much more than a month to master it, but it significantly improves power during ascents, so all the more reason to start using it!
- It's a circular movement with the feet, not just vertical, to limit "dead spots" when the pedal is at the top or bottom. At that moment, each foot "wraps" its pedal in a coordinated movement: while one pushes the upper pedal, the other pulls the lower pedal as if to claw at the ground.
- Circular pedaling engages the calf muscles and extensors much more than vertical pedaling, where the thighs are mainly working.
- It requires coordination—especially at high cadence—and the best way to learn it is to focus on one leg at a time while keeping your focus on the rest of your body. On a stationary bike, work one leg, then the other, for a few minutes each. Do this several times a week.
 While seated, work on your core strength and speed
- Watch the pros: up top, nothing moves, and yet they're spinning fast! In a seated position, efficiency is indeed optimal when you manage to ride comfortably at a high cadence (80 rpm minimum), this cadence offering the best biomechanical performance and muscle oxygenation. At high cadence, good core stability is essential; it allows for better distribution of force on the bike.
- Target cadences are 75-80 uphill and up to 105-110 on flat or slightly downhill terrain.
- This level of cadence implies a good cardiac output and specific training (hill speed), but also core work, and well-adapted gears (see last paragraph).
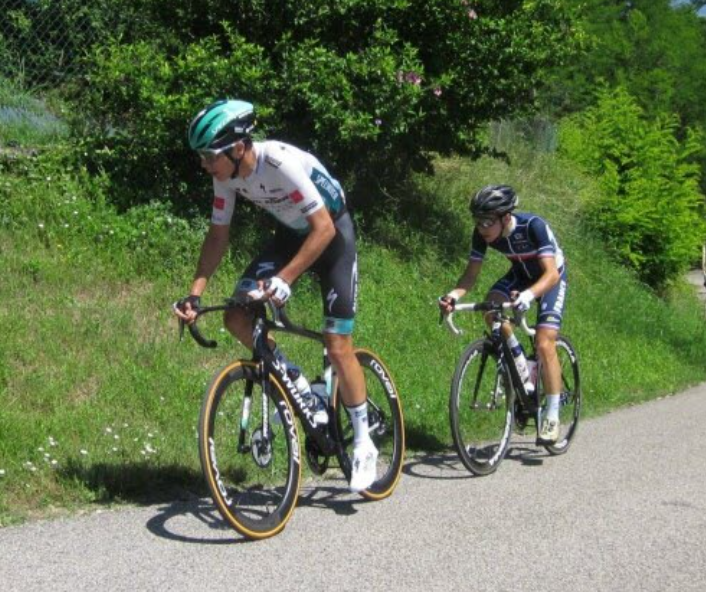
 As a dancer, work on fluidity
- In the mountains, we stand up on the pedals to accelerate on steeper sections or to relax after a long period of sitting. Indeed, when seated, the quadriceps (located on the top of the thigh) and gluteus maximus muscles are heavily used. The standing position allows them to recover by engaging other muscles (iliac psoas, rectus femoris, and sartorius)
- Shift down one tooth just before you stand up on the pedals, and shift up one tooth once you are seated on the saddle.
- To ensure efficient power transfer to the pedals, keep your torso upright, shoulders directly above the handlebars (no further forward), and shift your weight alternately towards the side of your descending leg, without moving the bike. Whether you use straight or bent arms is a matter of feel to find the most efficient and fluid technique.
- The pedaling motion remains smooth and fluid, with the ankles acting as pivot points, to avoid a sharp rise in heart rate.
- For effective learning, start at a low cadence (50-60 rpm) with high gears on climbs. While everyone has their own style, don't hesitate to watch how the pros do it – like in this photo of a master of the sport, Alberto Contador.
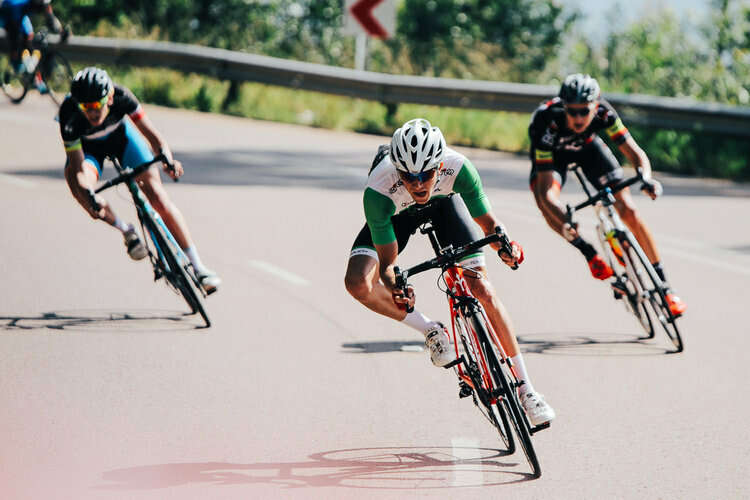
The descent technique
Mastering the technique of descending on flat terrain and small hills
- One of the biggest fears cyclists have on descents is the feeling that the bike will slip away from them. It's important to learn to descend smoothly and without stress, which also contributes to better recovery.
- Start by practicing on small bumps or even on flat ground for the downhill position.
- Mountain biking is an excellent way to overcome apprehension about downhill cycling.
The position is low, sitting on the back, the thighs are dynamic
- The body's center of gravity is lowered, for better stability in turns.
- The hands are in the drops of the handlebars, index and middle fingers on the brake levers, arms slightly bent and elbows low.
- To keep the rear wheel on the ground, the position is seated, pushing with the arms to carry the weight on the rear of the bike, even if it means taking your buttocks out of the saddle when you need to brake hard enough.
- The thighs are dynamic, in a "squat" position to absorb road imperfections and be able to react quickly.
- In a straight line, the cranks are parallel to the ground, one foot in front and one foot behind.
- We remain relaxed, taking advantage of the flat areas to relax our back, arms, and hands.
 The gaze guides the trajectory, projecting itself far away
- We naturally tend to ride where we look. Stay focused by looking far ahead, in the direction you want to go, and not at what you want to avoid or at your speedometer.
- Your gaze should always be directed towards the exit of the bend, then further down the slope to check for any obstacles or traffic.
- Avoid slopes (gravel) and be especially careful in case of white lines, gravel areas, stones, potholes, vehicles, other slower cyclists or pedestrians, animals, etc.
The body enters the curve and the opposite foot presses down on the pedal in the low position
- As on a motorcycle, the torso moves in the direction of the turn and the inside knee moves out to facilitate the turn.
- The outside foot presses down to improve grip, pedal at the bottom at 6 o'clock.
Braking is done with both brakes at the entrance to the turn, and then released afterwards
- Avoid constant braking to prevent overheating of the brake surfaces on the rims. If you must brake frequently, do so in 1-2 second intervals rather than one smooth, continuous braking.
- Brake as you approach the turn, before entering the curve, when both wheels are aligned. Raise your torso and simultaneously apply both brakes, modulating them correctly.
- If you're going too fast, press harder on the rear brake to prevent the front wheel from sliding out. That's why you need weight on the rear.
- Once you've started the turn, release the brakes, lean the bike over by applying pressure to the outside pedal to improve traction. Never brake while turning.
If possible, maintain pedaling speed and cadence to avoid heavy legs.
- Your legs have accumulated waste products on the climb, and soreness will appear quickly if they don't move at all.
- It's therefore necessary to maintain a minimum level of pedaling and cadence to prevent the feeling of heavy legs when accelerating again. To achieve this, avoid using too high a gear on descents. Hairpin bends are ideal for this, as the speed is relatively low.
- But if this creates too much imbalance, stop pedaling or pedal slowly, it will always be better than nothing!
Safety first!
- Always remain focused on potential hazards, those of the road itself (gravel, potholes, white lines, water...) or coming from vehicles or other cyclists.
- Respect the rules of the road.
And now, have a good training session, and don't hesitate to review the previous article for the first part of Mountain Bike Preparation: Physical Conditioning...
See you very soon at Chalet La Source!
![]()
